For detailed Canvas Studio tutorials:
https://community.canvaslms.com/community/answers/guides/studio-guide
-
Studio is a video-capture tool that is integrated into the Murray State instance of Canvas. It is accessible from the course navigation menu in any Canvas course, or from the Global Canvas Menu
-
The Studio link in the course navigation menu will access videos recorded within that course.
-
The studio link in the global navigation menu will take you to My Uploads, which is a collection of ALL of your studio recordings
-
You can insert a Studio recording into canvas content (Assignments, Pages, Discussions, etc.) using the Rich Content Editor.
-
When you create a video you can edit the video immediately with the provided screencast-o-matic software integrated Studio before uploading it into the Studio Cloud. Note: At this date you cannot re-edit an uploaded video except by downloading the video and editing it in an external video-editor, so it is important to immediately edit the video prior to uploading it to Studio. See below for more details about editing.
To record media in Studio:
1) Within a course, click on the Studio button on the course menu OR select "Studio" from the Global Navigation menu
2) Select “Record” button in the right corner control. You will be prompted if you have not done so already.

3) Select "Screen Capture". Note: Selecting Webcam Capture will not allow you to create a screen recording nor allow you to Edit webcam recordings.

4) Click on "Download" if you have not installed the application yet. This will download the app .exe file for you to install. (Note: You will only have to download and install the Screen Recorder application to your computer once. After the first time, you can proceed to clicking "Open Screen Recorder Launcher v2.0" in the window that appears)


5) Double click and follow the instructions. Once the app is installed you will get the next screen when you click on the record button.
6) Select "Open Screen Recorder Launcher v2.0" to use Studio after the app is installed.


(Screen Recorder)
7) You may select:
- Screen, which just captures your screen
- Webcam that just captures a webcam feed or
- Both, which will capture your screen with a small window overlay of your webcam feed in the lower right-hand corner.
From here, set the area of the screen to be captured, turn on computer audio if you want to capture sounds from your computer.
Preferences allows you to set things like hot keys for quick navigation, remove the countback, etc.
Once your preferences are set, click on the red Record to begin recording.
During recording, you can pause and then restart the recording, as needed. When you are finished recording, click on the Pause button, then select “Done”
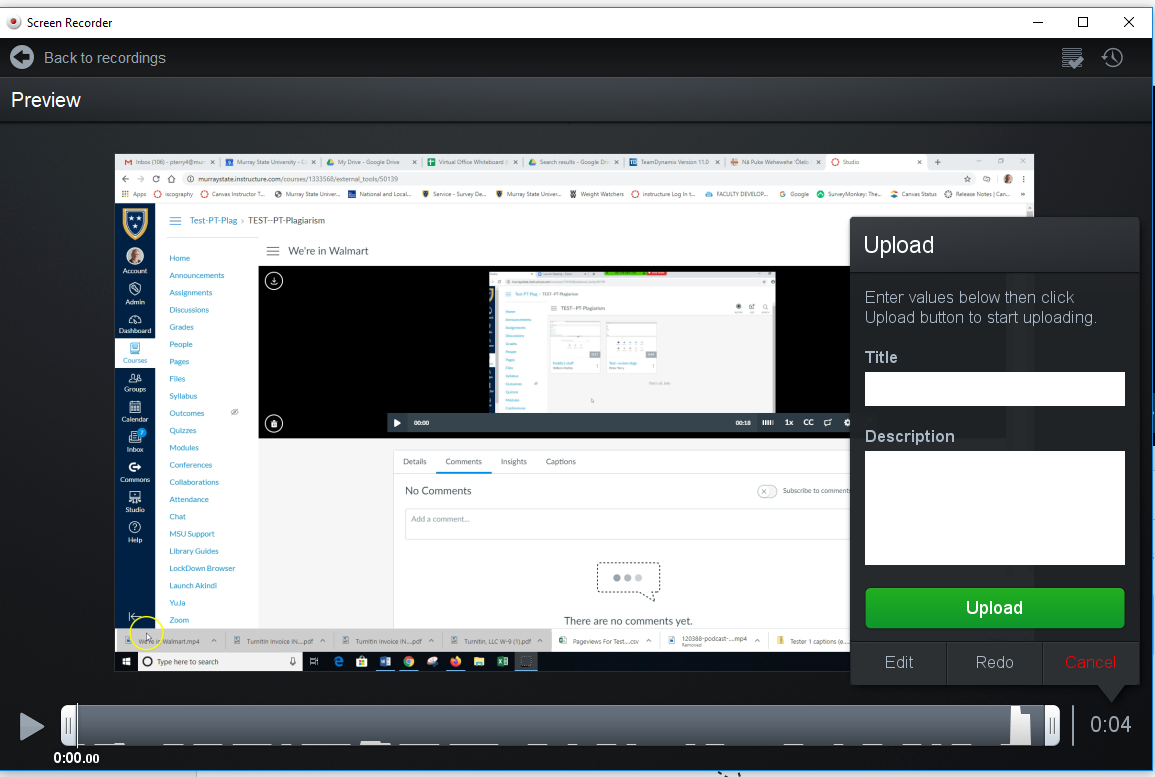
When you are finished recording, you will have the option to add a title and description, as well as edit your recording.
To edit, select “Edit” at the bottom of the Upload window on the right. Note: Recordings cannot be edited in Studio after you have uploaded them, unless you have an external video editing program, so any editing will need to be done before selecting "Upload"
Once you are done editing, select "Done"
When you are finished editing the details of your recording, Select "Upload"
Studio may need time to prepare your upload. After your video is finished uploading, select “Continue" to go to your Studio collection (My Uploads).

You can download your videos for backup or further editing by opening them here, then clicking on the download icon. You may also delete them by here without opening them by selecting the Options menu (3-dots) and selecting “Delete Media”.